
With the promise of auto-provisioning and self-healing, Kubernetes environments can be an attractive option to host your application platform. However with increasing budget restrictions, the competitive cloud providers and offerings, and need to do more with less, engineers are looking to get a handle on their resource utilization. In this blog, you’ll learn how you can optimize efficiency, availability and Kubernetes performance of multiple clusters by using the newly-released open-source tool AWS Karpenter. While using the Kubernetes API scheduler often has a steep learning curve, Karpenter can drastically reduce the effort required to refine your resource usage and get a handle on your Kubernetes cost optimization strategy.
What does the Kubernetes infrastructure for clusters look like?
In order to run a production grade Kubernetes applications, there are two main infrastructure level components:
- The control plane maintains the state of the Kubernetes cluster and makes decisions about how pod resource requests will be deployed and scheduled, how storage will be allocated, etc.
- The worker nodes (or kubelets) run the actual workloads that users want deployed.
The control plane generally runs on a static set of machines that are separated from the worker nodes for simplicity. Depending on application performance however, the worker nodes can be all sorts of shapes, sizes and numbers.

Scheduling
The most powerful part of Kubernetes architecture is the scheduler. The scheduler looks at the workloads (pods) that should exist and the state and requested resources of the underlying worker nodes to determine where to put these workloads.
A worker node can have lots of different resource settings and properties that determine whether a workload will be scheduled on it.
The most basic Kubernetes resource limits are:
- CPU – compute resources
- Memory – for memory requests
Additional Kubernetes scheduler properties can also include:
- OS/Arch: Is this the right OS (Windows/Linux) and cluster architecture(amd/arm) for my pod?
- GPU: For machine learning workloads, I may want them to be scheduled on GPUs to maximize application performance
- Topology: I may want my pods to be spread across different availability zones for redundancy.
- Plus many more
Kubernetes cost optimization example
For simplicity we’ll only focus on CPU and memory, although Kubernetes services take all of these properties and more into account for performance optimization. For our example, we’ll start with a node group defined with a 2CPU/8GB instance. We’ll start with multiple nodes (2) in the node group and 2 workloads (yellow) that need 1CPU/1GB each and 1 workload that needs 1CPU/6GB (red).
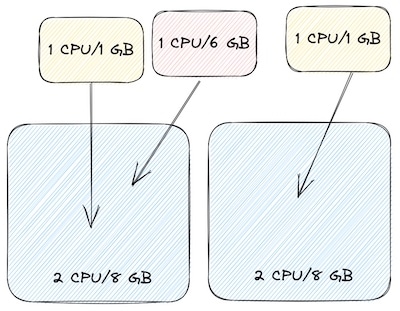
In this scenario, the scheduler will probably allocate our workloads like this where our first node has 0CPU/1GB free while our second node has 1CPU/7GB free.
Traditional rightsizing optimization strategies
If we had static workloads like this then the most efficient thing to do would be to keep our first node as is (ignoring the single GB free) and downsize our second node to only have 1CPU/1GB. This would require us to split into two different node groups, manage individual nodes or something equally complicated. This would also only be perfect in a world where our workloads never change. However, we know that this isn’t realistic not just because we’re always adding/removing workloads but also because we may be scaling these workloads themselves with a Horizontal Pod Autoscaling or Vertical Pod Autoscaling.
Let’s see how traditional rightsizing would affect Kubernetes performance.
Suppose we need to handle more load so we add 2 more replicas for the red workload with 1CPU/6GB each. We can definitely add 1 more red workload but 1 cannot be scheduled no matter how we slice it.

Traditional autoscaling
With traditional autoscaling, our autoscaler will bring up another node based on our existing configuration. This isn’t a horribly inefficient configuration, we only have a collective 1CPU/4GB unused but we can see how quickly this can grow to be more inefficient. We also can see how manually figuring out the right shape for nodes and node groups can also be a constant battle given how dynamic things can be.
Inverting the autoscaler with Karpenter
The traditional Kubernetes autoscaler works like this:
- Identify anything that can’t be scheduled
- Scale up existing node group
- See if there are 2 nodes with less than 50% utilization
- Move the pods on to 1 node
- Scale down existing node group
Karpenter is a brand new type of Kubernetes autoscaler that inverts how we think about our underlying node infrastructure. Karpenter does things in a much more dynamic way by provisioning nodes just in time:
- Identify anything that can’t be scheduled
- Provision a single node that will be used efficiently
- See if pods can be consolidated into a cheaper node
- Provision and deprovision accordingly
Let’s see how Karpenter would potentially handle our earlier scenarios.
We’ll start with 0 nodes and our original workloads 2 x yellow and 1 x red.
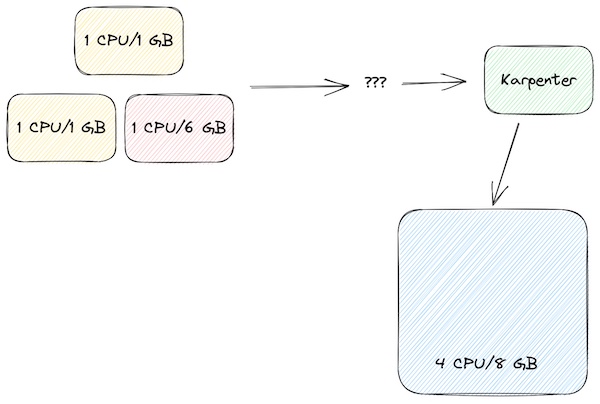
Karpenter determines that a single 4CPU/8GB node will be the most efficient configuration here which is better than what we had in our last manual configuration. Now what happens if we scale up our workloads again by adding 2 red workloads.
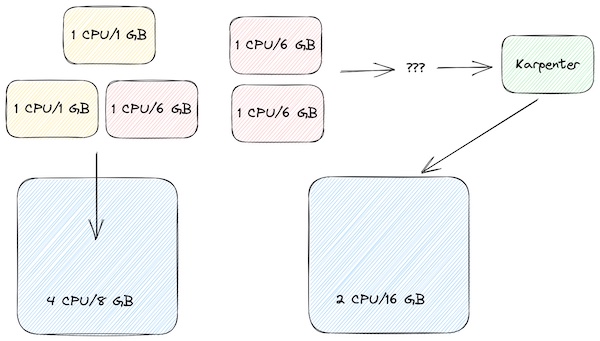
Now Karpenter sees that we need a lot of memory but a lot of CPU so it provisions a different type of node that has 2CPU/16GB. We still have 4GB unused but all the CPUs are being used which is again, more efficient than our previous scenario. But wait, there’s more
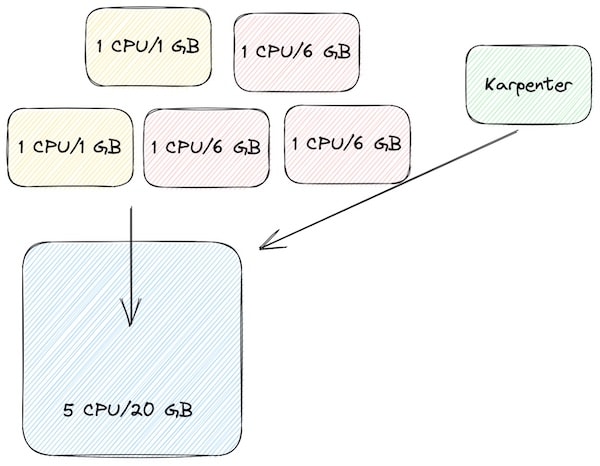
Karpenter Kubernetes cost optimization
During the consolidation step mentioned above, Karpenter may realize that there is a cheaper way to run all of our pods. In this case it combines all of them into a single 5CPU/20GB node giving us 0 waste but in different scenarios it may consolidate into multiple smaller nodes and redistribute the pods. Karpenter will respect any disruption budgets specified by your workloads so this consolidation will only happen if it’s allowed by your apps.
Considerations when transitioning to Karpenter
Here at Speedscale we are always at the cutting edge of Kubernetes and we recently moved from K8s Cluster Autoscaler to Karpenter. The transition was very smooth and it even handled our mixed use ARM and AMD nodes (Setting up a multi-architecture Kubernetes Cluster) correctly.
There were a few autoscaling gotchas that we had to be wary of:
Cluster autoscaler and Karpenter should not be running in parallel
This will usually cause more resource requests than needed.
Make sure Karpenter is never scheduled to run on nodes provisioned by Karpenter
This can be done by using a pod anti affinity or even running Karpenter in a separate cluster.
Karpenter will respect pod scheduling recommendations more strictly than other setups will
For example, if you have pods anti affinity preferred during scheduling for topology, Karpenter will almost always provision nodes accordingly for eg. spin up nodes in different AZs. In a different cluster environment, the scheduler would try to do this but if no nodes met the criteria, it would ignore the preference.
Deleting a provisioner
This will also delete all the nodes that were provisioned.
Conclusion
We touched on how the typical use of the built-in Kubernetes API scheduler works and all the different factors how difficult it can be to optimize your underlying infrastructure. Under normal circumstances it can take a lot of operations work, human observation and trial-and-error to balance availability, cost and efficiency for multiple Kubernetes clusters. These optimizations become increasingly important as you provision large clusters for your production environment. However, in this blog you learned how inverting our node provisioning using something like AWS Karpenter can lower the cognitive load and labor required, and reduce the scope to configuration options.